Level Up Your Homemade Rotisserie Chicken With These Expert Tips
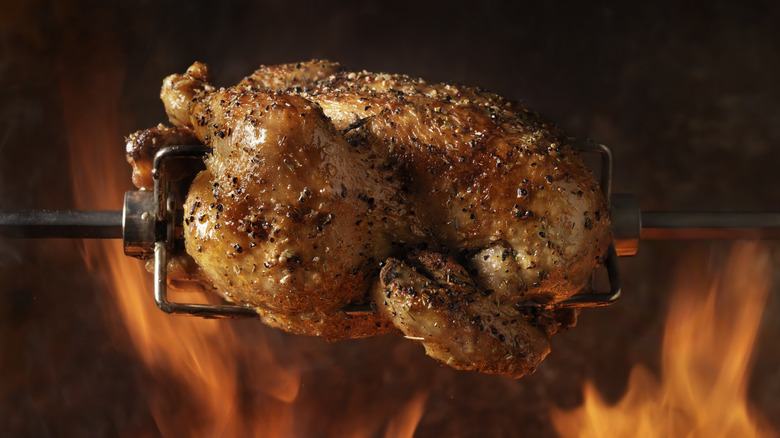
Roasting chicken on a rotating spit is by no means a modern technique, and there's a reason it's remained popular in the centuries since its invention. Rotisserie is simply the best way to ensure even cooking throughout the whole bird, as it guarantees every surface gets an equal amount of time facing the heat source. Rotating the chicken also allows the chicken to self-baste, meaning the meat ends up juicier and more flavorful.
The good news is that technology means we have automated spits, so it's never been easier to make rotisserie chicken yourself. I, like most people, fell in love with rotisserie chicken after picking up a pre-cooked one at the store and was amazed by the flavor and convenience. Later, while working at a highly-regarded brasserie-style restaurant in New Zealand, I realized that it was something I could recreate at home and that it wasn't any more difficult than other methods for preparing chicken. Working with professional chefs, I was able to pick up a number of extremely useful tips for making my own delicious rotisserie chicken over the grill or in the oven. Below, I'm listing my favorite rotisserie chicken hacks that will work wonders no matter what recipe you have in mind.
Dry rub and marinate for the best results
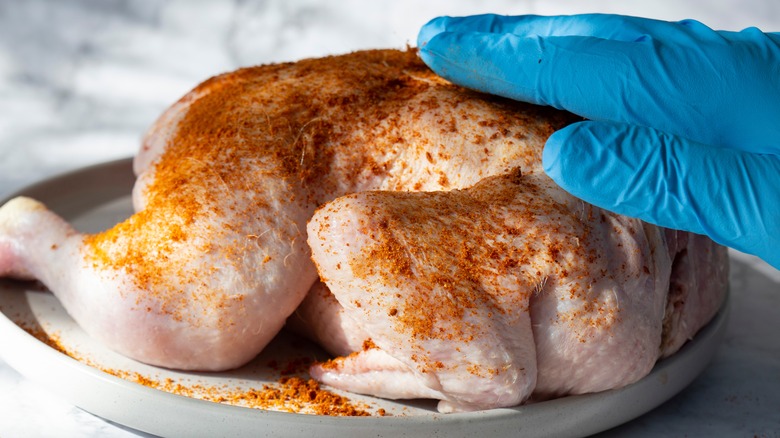
There are typically two main ways you can prepare rotisserie chicken in advance of cooking to bring out the best flavor and texture. Most chefs will either use a dry rub or marinate the bird, and both methods have their own set of pros and cons.
Using a dry rub of seasoning and salt — also known as a dry brine — and leaving the chicken overnight will help the meat retain moisture while it cooks. A dry rub also promotes better browning and crisping of the skin. On the other hand, marinating tends to result in a juicier chicken. Personally, I prefer a hybrid approach which gives you the best of both.
Out of the two methods, dry brining benefits more from having a longer activation time, so it's best to do this first, leaving the chicken overnight if you can. Then, for the marinade, a few hours before you start cooking should be enough. Part of the way marinating meat works is that the acid in your mixture helps tenderize the meat. If I'm marinating chicken overnight, I prefer to use yogurt as the lactic acid is relatively slow-acting; however, in this case, I'll use citrus juice, as citric acid works faster. To marinate, go for a gallon or two-gallon-sized Ziploc bag, as this gives you enough space to massage the sauce into the meat, helping to avoid potential food safety issues that can arise when working with raw poultry.
Fill the cavity with flavorful ingredients
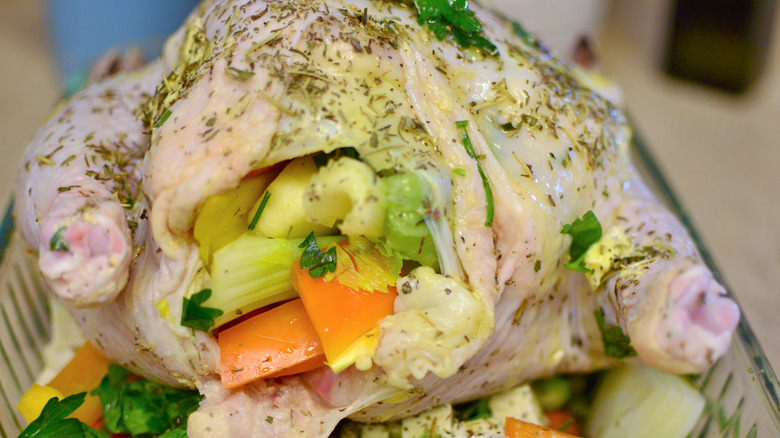
After dry rubbing and marinating, there's another easy trick that'll help infuse your rotisserie chicken with extra flavor — stuffing the cavity with aromatic ingredients. You can do this before you marinate the bird or just before you put it on the spit, but I've found that it doesn't make much difference if you're not marinating overnight.
First, you'll want to check that the cavity is empty, as some chickens are sold with a bag of giblets tucked inside. If there is a bag in there, you can safely throw this away. Next, you'll want to stuff the cavity with your flavoring ingredients. Salt and pepper are a given, and I always throw in a roughly chopped onion and garlic cloves — I subscribe to the ideology that there's no such thing as too much garlic. Then, add fresh, fragrant herbs. Rosemary, thyme, parsley, and a few bay leaves are my go-tos. You'll also want to add half a lemon for a touch of citrus, and it will help add moisture.
However, remember that when you're using a rotisserie, you'll also need space to thread the pole through the chicken. This means you may need to cut your ingredients smaller so they don't get in the way, or you can mash them into a rough paste. We're not going to be eating the stuffing afterward, so don't worry about keeping them nice and presentable.
Truss the chicken with skin instead of twine
When cooking a whole chicken, most pros will truss the bird first. Trussing — essentially tying the bird's extremities to the body with twine — is especially beneficial when using a rotisserie, but it can be a fiddly business. Trussing helps the chicken to cook more evenly by keeping everything close together. With wings and legs protruding, there's a higher chance they'll end up overcooked, as they'll be closer to the heat source than the bulk of the bird. Knowing how to properly truss a chicken with twine is a useful skill to have, but there's a much easier method.
Instead, you can use the skin of the chicken to hold the extremities in place. First, lay the chicken on its back, and pinch a piece of the loose skin adjacent to the cavity. With a paring knife, make a small incision in the skin, fold over the leg on the opposite side of the cavity, and carefully tuck it into the hole. When you're happy with how the skin is holding the drumstick in place, repeat with the other leg. For the wings, twist the wing tip around so that it's held in place by the upper part of the wing. If you find that this method isn't holding the limbs in tightly enough, you can scald the trussed chicken with boiling water before dry rubbing or marinating. This will cause the skin to shrink slightly, creating a better hold on the extremities.
Use a pan to save the drippings
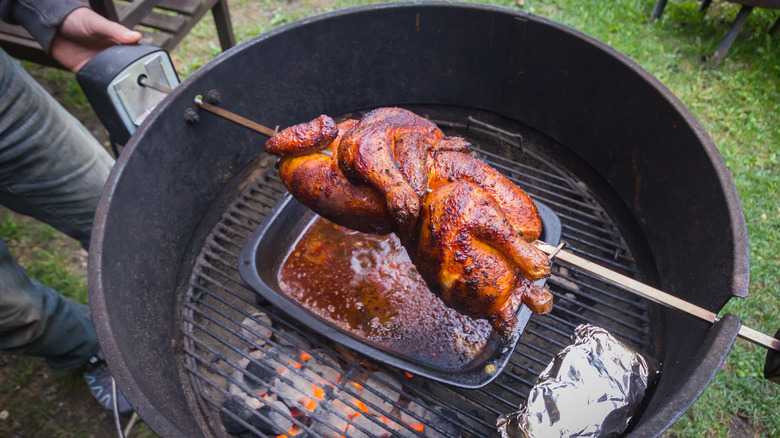
Whether you're cooking rotisserie chicken in the oven or over an open grill, you're always going to get a run-off of fat and liquid. In the former, these drippings will make a mess of your oven, and with the latter, there's a chance you'll get flare-ups when the hot fat hits the open flame.
The solution is to place a metal pan beneath your rotating chicken to catch the drippings. The main thing to bear in mind is that these drippings will contain a lot of fat, so you'll want to avoid disposing of them down the sink as it can cause blockages. Rather, wait for the liquid to cool and set, scoop the greasy mixture out with paper towels, and throw the towels in the trash. That said, if you're throwing away your drippings immediately, you're effectively getting rid of an extremely useful and tasty sauce ingredient.
The drippings will contain tons of delicious chicken flavoring, as well as flavors from your seasonings, marinade, and the ingredients you used to stuff the chicken. For a rich and tasty homemade gravy, first make a roux by gently heating a mixture of equal parts drippings to flour. Then, you can add chicken broth to create your desired consistency while adding your favorite seasonings to boost the taste. If you feel your gravy is too thin and watery, you can always add a little cornstarch to thicken it back up again.
Use a basting spray
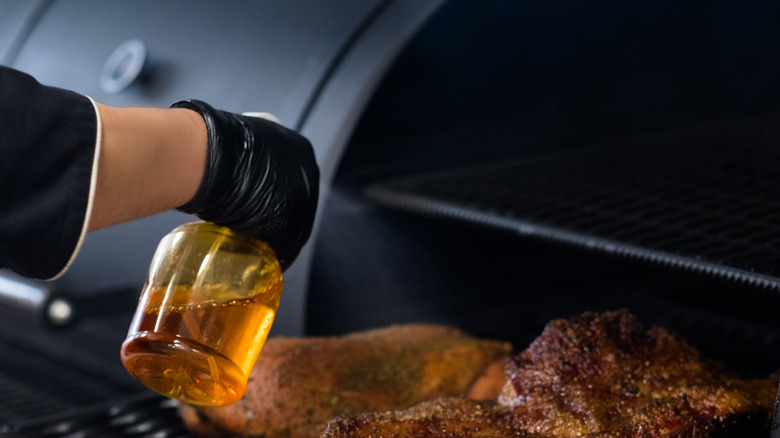
Whenever you're cooking a whole chicken, it's a good idea to baste it by spooning the drippings over it from time-to-time to prevent the meat from drying out. However, I prefer to make my own basting spray instead.
Making your own basting spray comes with a few distinct advantages. A spray gives you more control over the amount of liquid you're applying each time. Too much liquid can prevent the chicken skin from crisping up properly, whereas spritzing lets you add a light coating instead. I also find it's better for achieving an even coating across the whole chicken and reaches deeper into the nooks and crannies. As tasty as chicken drippings are, making a spray means you can bolster the flavor profile with your own ingredients.
My go-to mix is apple cider vinegar mixed lemon juice and some of the chicken drippings, and I'll occasionally melt a little butter in there as well. Just bear in mind that if you make your spray too thick, it'll struggle to come out of the spritzing nozzle, so you may need to water it down slightly. The acid in the vinegar and lemon juice helps to balance out the fat in the skin while breaking it down further, letting the seasonings sink deeper into the meat. The spray will also add more flavor to your rotisserie chicken as it cooks. The trick is not to over-baste, so a quick spray every 15-20 minutes should do the trick.
Transform your grill for a smoky flavor
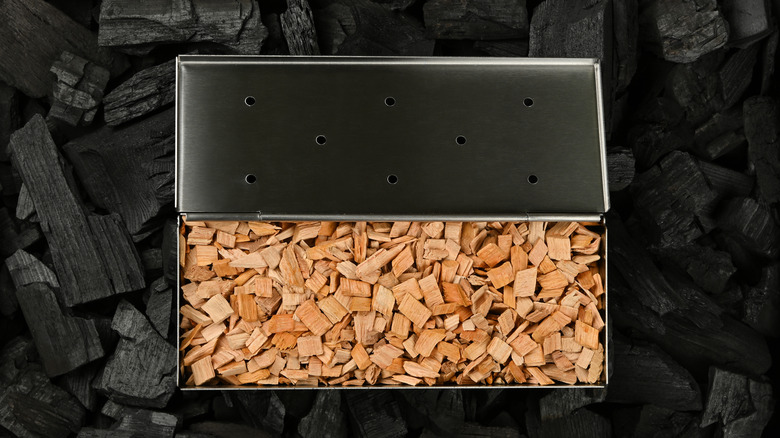
If you're anything like me, there's nothing better than the deep and complex flavors of smoked meat. That said, the time, effort, and costly specialist equipment it takes to smoke meat properly can make one question whether it's worth the fuss.
Fortunately, if you're using a grill, there's a cost-effective trick to convert it into a smoker. A smoker box is essentially just a metal container with holes drilled through the lid, straightforward enough that you can even make your own if you have the right tools and materials. Simply fill the smoker box with your preferred wood chips and set it on top of the grill, below your rotating chicken. The heat from the grill — gas, electric, coal; it works on all types — will char the wood chips and the holes in the lid will direct the smoke up toward the meat, imbuing it with rich barbeque flavors.
In terms of which wood chips to use, I find that sweeter woods — like those from fruit trees — are the best match for chicken. Apple, peach, or cherry wood are a great place to start. If you prefer a bolder smokiness, you can't go wrong with hickory, while maple is more subtle, and pecan wood will offer a slight nuttiness to your chicken. There are plenty of great options but, ultimately, you want to pick something that pairs well with your seasoning and marinade ingredients.
Use foil if the outside is cooking too quickly
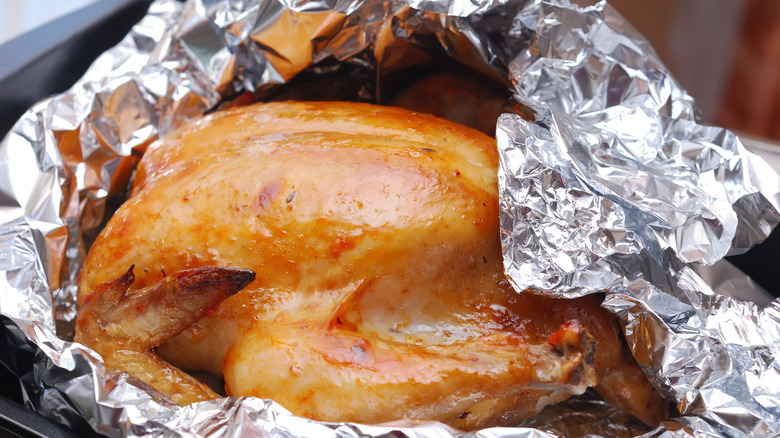
Even with a properly trussed chicken, there's a chance that parts of the exterior will start to cook quicker than you'd like. However, we can't stop cooking unless the interior is done or we run the risk of eating contaminated chicken, which should be avoided at all costs.
Fortunately, we can protect sections of the bird that are cooking too quickly with aluminum foil. The best part about aluminum foil is that it's tearable and moldable, so we can target specific areas of the chicken if they're starting to cook too rapidly. Simply tear off a suitably sized piece and wrap it around the offending section. It shouldn't be too tight or it'll trap escaping moisture, potentially leading to soggy skin. You don't have to worry about whether the foil is shiny side up or not, as the shininess is just a feature of the manufacturing process and has no meaningful impact on how much heat is reflected away.
Although the foil will protect the outside of the chicken from overcooking, bear in mind that we do still want a nice, crispy exterior. When your chicken is about 10-15 minutes away from being ready, you'll want to remove your foil shields. This should allow enough time to sufficiently heat the previously covered parts of the chicken and for the Maillard reaction to continue, allowing the skin to brown as it caramelizes.
Wiggle the leg to check for doneness
When it comes to safely cooking chicken, there's little room for error. According to the USDA, the minimum safe temperature for chicken is 165 degrees Fahrenheit all the way through, as this ensures that any foodborne bacteria has been completely destroyed.
The most accurate way to check that your chicken is fully cooked is with a food thermometer, with the probe inserted into the deepest parts of the breast, leg, and wing. If the readout is lower than 165 degrees Fahrenheit, you need to continue cooking your bird until you hit this target, and if the exterior looks done at this point, you can use the foil trick to protect the skin. It's also worth knowing that while infrared thermometers are excellent for gauging the temperature of your grill or oven, they only measure surface temperature and shouldn't be used for testing doneness.
The good news is that if you don't have a food thermometer, there's a backup hack for checking whether your chicken is ready to eat. First, use a small knife to un-truss one of the chicken's legs. Then, give it a wiggle. If the leg moves back and forth freely and it feels like you could easily pull it off the body, this is a pretty reliable sign your chicken is finished cooking. That said, it's still not as reliable as using a thermometer, so I'd always visually inspect the chicken too by taking a cut from the thickest section of the breast and checking for pinkness.
Shred the chicken inside a ziploc bag
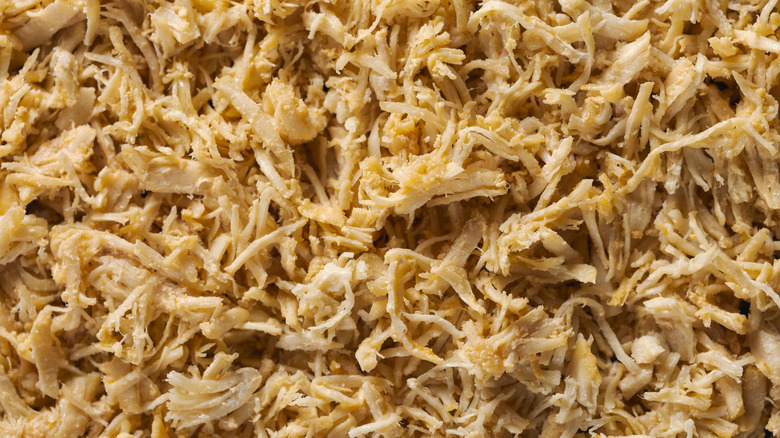
One of the most popular ways to use rotisserie chicken — store-bought or homemade — is to shred it. The combination of juicy chicken chunks and crispy skin pieces makes for an extremely versatile ingredient in everything from salads to tacos, but pulling the chicken apart can be messy and time-consuming.
I've seen chefs use a stand mixer or a hand mixer to shred chicken, and while this method is pretty effective, you still need to debone the chicken first. I used to use two forks to hold and pull apart the meat — that is, until I learned about the plastic bag hack for shredding rotisserie chicken. Out of every method I've seen and tried, this is by far the quickest and cleanest, and I can't see myself trying anything else now.
First, you'll want to grab a large Ziploc bag that will fit the entire bird inside, the same size that you used for marinating. Let the chicken rest for about 15 minutes so it cools slightly and the juices redistribute, slip it inside the bag, and seal it shut. Now, you can simply massage the chicken off the bone in chunks while the bag protects your fingers from the heat and chicken grease. With the chicken off the bone, you can concentrate on breaking up the larger pieces to your desired size, and if the bones are getting in the way, you can always pull them out, reseal the bag, and continue shredding.
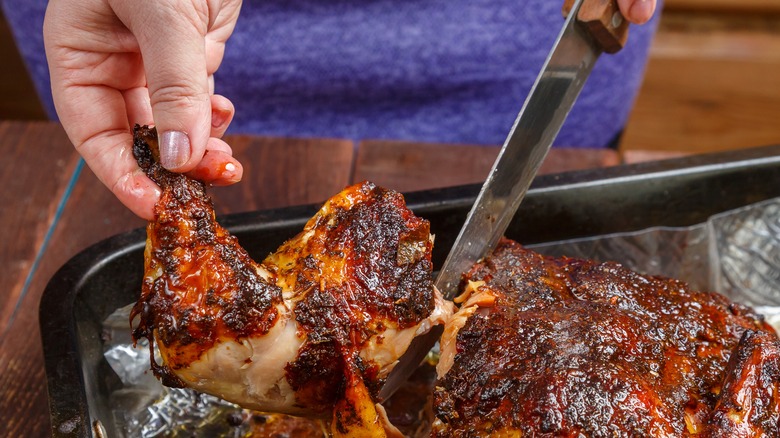
Use scissors to carve up your chicken
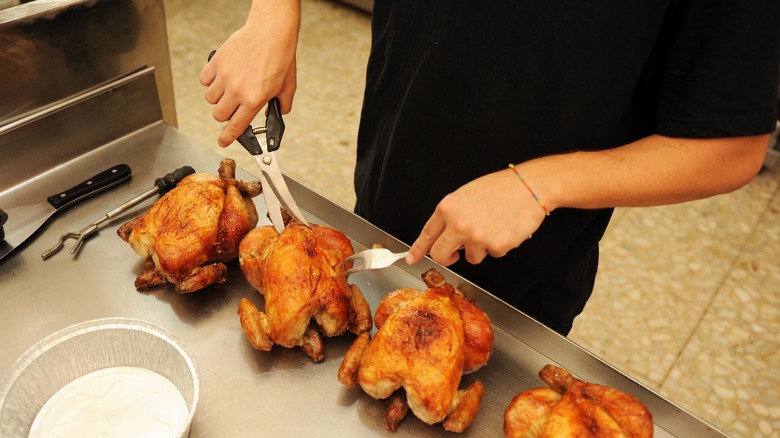
If you're not shredding your chicken, you'll need to carve it up instead, and this can be a frustrating process without practice and experience. While using a knife to carve chicken might make you look the part, there's a much faster and simpler way to get the job done.
Instead of using a knife, grab yourself a pair of sharp kitchen scissors. First, after giving the chicken enough time to rest, snip the trussing twine or, if you used my method, slip the legs and wings out of their holes. Next, cut through the skin on each side between the legs and the breast to loosen the legs, then cut along the sides of the spine to remove them. Cut through the breast bone to separate the breasts, then remove them one at a time by cutting along the spine and through the ribs. Lastly, remove the wings from the breasts by cutting through the cartilage at each shoulder joint. If you like, you can split the wings into the flat and drumette and cut the drumsticks from the thigh. If you want to cut the breasts into smaller pieces, simply cut them perpendicular to where the spine would be from the inside to the skin side. If you feel like your chicken's cooled too much by this point, I suggest reheating it briefly under the broiler in your oven, as this will also help give the skin a little extra crunch.