Dinosaur Kale Pizza With Pickled Red Onions
We may receive a commission on purchases made from links.
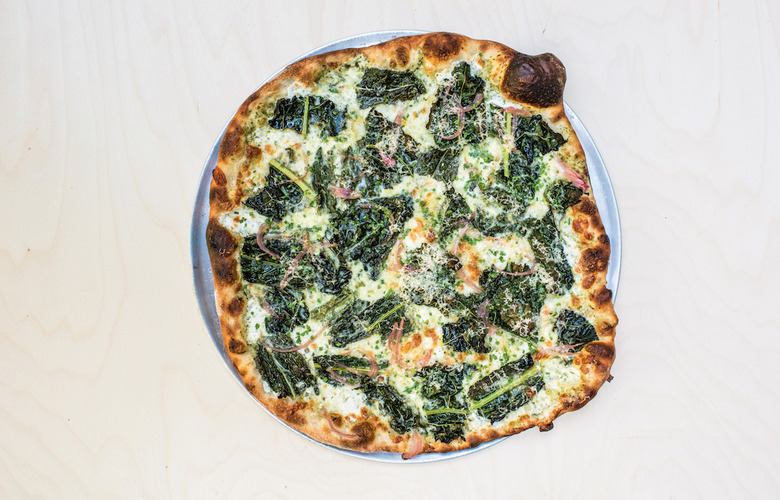
The only thing missing from Philadelphia pizza master Joe Beddia's cookbook, Pizza Camp, is a form to sign up for actual pizza camp. We'll settle for just the book, though, as it's thoroughly packed with knowledge on making the best pizzas of your life. This dinosaur kale pizza with pickled red onion hits all the right flavor notes.
It makes me laugh that people are impressed by pickling. You can pickle something in 30 minutes, no practice or prior knowledge necessary. The pickled element really balances out the flavor and richness with the acid.
Dinosaur Kale Pizza With Pickled Red Onions
Get ready to make the best pizzas of your life. This dinosaur kale pizza with pickled red onion hits all the right flavor notes.
Prep Time
35
minutes
Cook Time
30
minutes
Servings
1
14- to 16-inch pizza
Ingredients
- 1 ball dough (about 1-pound)
- 2/3 cup Spring Cream
- 3 ounces fresh mozzarella
- 2 cups shredded low-moisture mozzarella
- 4 to 5 handfuls roughly chopped or torn dinosaur kale leaves
- 1/2 cup pickled red onions
- 3 tablespoons grated hard cheese
- extra-virgin olive oil
- 2 tablespoons chopped fresh chives
- 1 handful basil (10 to 20 leaves)
- 1/2 cup chopped fresh fennel fronds
- 1/2 cup chopped fresh chives
- Zest and juice of 1 lemon
- 1 large clove garlic
- Fat pinch red pepper flakes
- 4 cups heavy cream
- Fine sea salt and freshly ground black pepper to taste
- 1/2 cup red wine vinegar
- 1/4 cup white wine vinegar
- 3 tablespoons fine sea salt
- 2 tablespoons sugar
- 1 teaspoon whole black peppercorns
- 1 bay leaf
- 1 clove garlic
- 2 medium red onions
Directions
- :::onions:::
- Combine 1 cup water with both vinegars, salt, sugar, peppercorns, bay leaf, and garlic in a small saucepan over high heat. Bring the mixture to a boil, then strain out the solids and add the onion slices. Let the onions steep in the pickling liquid for 15 to 20 minutes. Drain and they’re ready to use right away. You can also transfer them to an airtight container and store in the fridge for up to 2 weeks.
- :::cream:::
- Combine all the ingredients in a food processor. Blend until slightly emulsified. It will keep in the refrigerator for about 5 days.
- :::pizza:::
- Place your stone on the lowest shelf of your oven, then turn your oven to its highest temperature. Most ovens go to 500°F and some to 550°F. Heat your stone for at least one hour before baking.
- If you’re taking your dough out of the fridge, give it about 15 minutes or so to warm up a bit so it will be easier to work with. It should have doubled in size in the fridge. If it hasn’t, let it sit at room temperature, covered with a slightly damp towel, until it does.
- Lightly flour your counter and your hands. Flip the dough into the flour bowl so the top side of the dough ball gets dusted first. Flip it once more, making sure that the dough is completely coated. Press the dough down into the flour, then pick it up and place it on the floured countertop.
- Pressing your fingers firmly into the dough, start by flattening the center and work your way out toward the edge to make it wider, until it’s about 7 to 9 inches wide. Pushing down on the dough will release some of the gas and actually begin opening up the dough. Be careful not to disturb the outermost lip. This will eventually become your crust.
- The next step is a bit tricky. Your goal is to take this disc of dough and carefully stretch it to about 14 to 16 inches without tearing it or creating a hole. I pick it up with floured hands and begin to gently stretch it over my fists, letting gravity do most of the work.
- Once you’ve stretched it enough, put the dough back on the counter, making sure there is a generous dusting of flour underneath. Take a few generous pinches of semolina flour and dust your pizza peel. Make sure it’s coated evenly. Gently lift and transfer your dough to the peel. Make sure both your hands and the peel are well-floured. You are now ready to dress your pie.
- Liberally coat your dough with the spring cream. Add your mozzarellas. Add the kale, then your cooled pickled onions.
- Transfer to the oven. Bake for 3 minutes, then open the oven, pull out the rack with the baking stone, crack the eggs into the center of the pizza, and season them with salt and pepper. Push the rack back into the oven, close the door, and finish baking.
- The crust will rise significantly. Then change the oven setting from bake to broil, cooking the pizza from the top down until the crust begins to blister. The residual heat of the stone will continue to cook the bottom. (If your broiler is at the bottom of your oven, skip this step and continue to bake the pizza as described.) I cook all my pizzas until they’re well done, which could take up to 10 minutes total (sometimes less). Just keep checking so you don’t burn it. Look for the cheese to color and the crust to turn deep brown. It may blacken in spots, and that’s okay.
- Finish with the grated hard cheese, a drizzle of olive oil, and the chives.