Making Your Own Deli Meats At Home: Equal Parts Simple And Delicious

Food Republic's column Ask Your Butcher seeks to answer FAQs in the world of butchery. Ethically minded butcher Bryan Mayer founded Philadelphia's Kensington Quarters and helped develop a renowned butcher-training program at Brooklyn's Fleisher's. Today, he consults with farmers, chefs, butchers and anyone else who will listen. In each column, Mayer tackles a pressing issue facing both meat buyers and home cooks. Here, he explores making deli meats at home.
I've always found a certain amount of catharsis in making a sandwich. Firstly, there's choosing the type of bread: perhaps a brioche or challah, to balance the saltiness of the meat, if any. Or, maybe a sfilatino, my personal favorite for a panino. Then there are your olive oil-based breads, like focaccia and ciabatta, sourdoughs, whole grains and, yes, even wraps.
Why single out wraps? Back in 2006, a Massachusetts court heard a case that determined the legal definition of a wrap. Panera Bread, which had been granted exclusivity over all things sandwich at a suburban mall, charged that an encroaching Qdoba — with its signature burritos — was, in fact, serving sandwiches. A quick look at Webster's Dictionary and a few expert witnesses later, and the judge ruled in favor of Qdoba. However, The Oxford Encyclopedia of Food and Drink in America calls wraps "sandwiches" and so does Wikipedia. So that settles it for me. I'm going with a wrap being a sandwich. (Feel free to use that little story at your next dinner party.)
But I digress. What are we putting between (or inside) that bread? Meat! Okay, veggies too, and sometimes only veggies. I could eat a falafel from Aba's every day. Whether it's a muffuletta from Cochon in New Orleans, stacked high with cured pork and beef, or a simple beef salami-and-bologna sandwich from Montreal's Wilensky's, however, meat is at the center of a great sandwich. So as summer comes to an end and you're set to head back to school or spend more time at the office while trying to save a little extra cash, why not seriously up your sandwich game and make your own deli meats?
While there are a few examples out there of decently sourced (and somewhat healthily prepared) ready-to-eat deli meats, most leave a lot to be desired. Whether composed from animals raised in less-than-idealistic conditions or pumped full of water and unnecessary ingredients, why not take the same agency over your sandwich as you do over your burger? Making your own deli meats requires little more than buying a great hunk of meat and cooking it. Sure, there's the prep time of making a sandwich, but while all your coworkers are waiting in line at whatever the next sandwich hotness is, you'll actually get to enjoy your lunch break.
Let's start by talking about equipment needs. Before you run out to your local restaurant equipment store, there are a couple of hacks that might work for you. The simplest and easiest is a sharp knife. Now, you won't get those paper-thin slices that you can read through, but sometimes you want a little something to sink your teeth into, especially with corned beef. Of course, you'll have to maintain that razor-sharp edge, and that requires either more equipment or a great knife shop.
Here's hack number two: I'm sure many of you have a mandoline. Yes, that torture device created with the sole purpose of slicing off bits of your fingertips while you make homemade potato chips. (Homemade chips, by the way, are a great accompaniment to your homemade deli meats; severed fingertips, not so much.) With a little forethought, this device can be repurposed as a makeshift meat slicer. All that's needed is a bit of par-freezing for a couple of hours and your meat should be stiff enough to get some fairly thin slices. Not satisfied with these options? A meat slicer it is! I recommend something small, lightweight and somewhat inexpensive. Remember that you're not Katz's and are not churning out 1,000 sandwiches a day. You can get a slicer from LEM, maker of home processing and sausage-making equipment, for less than $100. I've used LEM products for years and have always been satisfied.
Roast Beef
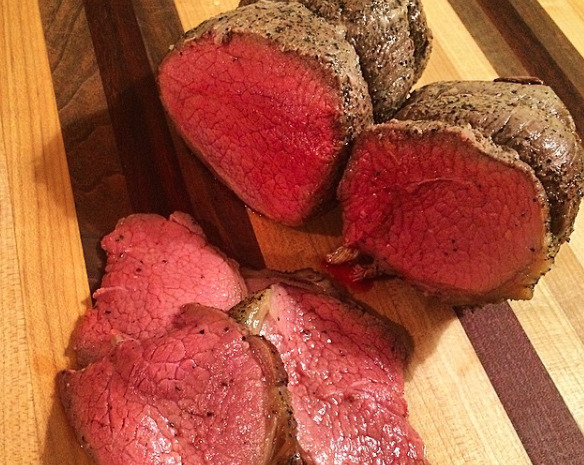
Let's start with a simple roast beef. I find few things more satisfying than a roast beef sandwich and a root beer. Heck, I'll even gussy it up a bit with dinner and enjoy a glass or two of red wine. Whatever your drink of choice, this is as simple as it gets. You don't need to go fancy with your cuts for this. But, as always, let's make sure that we're sourcing from local farms that raise animals out on pasture and are grass-fed — you knew I was going to say this. I think eye-of-round is the perfect cut. It's a single muscle off the round (leg), free of any sinew and, hopefully, trimmed properly by your butcher, with a nice fat cap. You'll want that fat, as it will add to the flavor as it renders while you slowly roast.
But let's back up. The night before, take your eye round and liberally salt it, wrap it and place it in your fridge overnight. The salt will act as a tenderizer as well as add flavor. When you're ready to cook, salt and pepper the roast, toss in a few beef bones, set your oven to 300°F and roast until the internal temp is 115°F to 120°F. You'll get a perfectly rare roast beef. Let it cool and slice away. I keep things classic with a couple of slices of rye, lettuce, tomato and onion, and, of course mayo. I dig the Sir Kensington variety, as it's got a bit of a lemony tang to it.
Roast Beef Recipe
Ingredients
1 three- to four-pound eye round, fat cap on
2 tablespoons fine sea salt
Coarse salt and peppercorns to taste
A few small beef bones
Directions:
Ham
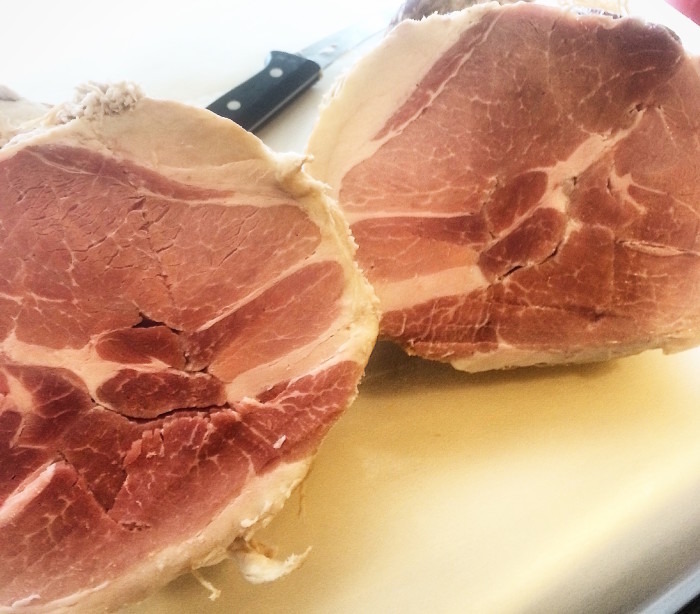
The porcine equivalent to the simple roast beef is a classic ham and cheese. Serve it on a crusty, buttered baguette with a few thin slices of Swiss cheese and perhaps a side of pickles and mustard. Prepping a ham takes a bit longer than your roast beef, but it's absolutely worth it. You won't need a whole ham, unless you're planning on making lunch for the entire office for the week. Ask your butcher to reserve you the top round or bottom round from the ham.
This time we're going to switch things up a bit and boil it. Or rather, we're going to simmer it. But first, we brine. (I keep things simple here.) As with our beef, your pork should have great natural flavor. Why cover it up? Salt and sugar is all you need. For your three- to four-pound ham, two and a half and one tablespoon, respectively, should do. Place your ham in a large bowl, cover with water, add salt and sugar and allow a day per pound to brine. The longer you allow it to brine, the more flavorful it will be. After you've brined, all that's left to do is cook. Give your ham a quick rinse, toss it into a pot, fill with water and simmer until it reaches about 155°F. That's usually 20 to 25 minutes per pound.
Ham Recipe
Ingredients
1 three- to four-pound top round or bottom round, fat on for bottom round, cap muscle on for top round
2½ tablespoons salt
1 tablespoon brown sugar (you can use honey or another sweetener if desired)
Directions:
Corned Beef

I've saved the most labor-intensive, time-consuming and, in my opinion, tastiest cut for last: corned beef. "Corning" is another word for adding salt to meat, or curing. I like using a rather fatty, four- to five-pound piece of brisket. To that, you add a mix of clove, allspice, juniper berries, cinnamon, ginger, bay leaves and sugar, cure for several days, simmer for a few hours and you're done. Now, a cold corned beef sandwich will never replace the classic Reuben. But as they say, a cold corned beef sandwich is better than no sandwich at all. Two pieces of rye, some Swiss, a spicy, coarse-ground mustard and a bit of coleslaw if you like, and enjoy it cold. If you're at home, use just a bit of butter in a pan to heat things up. If your office has a sandwich press, even better!
Corned Beef (adapted from Alton Brown’s recipe)
Ingredients
1 four- to five-pound brisket with fat on
1 cup kosher salt
½ cup brown sugar
1 cinnamon stick, broken into pieces
1 teaspoon black peppercorns
8 whole cloves
8 allspice berries
12 whole juniper berries
2 bay leaves
1 teaspoon mustard seeds
½ teaspoon ground ginger
Directions:
With so many permutations of the homemade sandwich, one could never get bored. Unless, of course, you have a problem with the most efficient and delicious meal delivery system ever created.